iOS 18의 전체 뷰 트리를 그리면 다음과 같습니다.iOS 26에서 Liquid Glass가 도입되면서, 한 가지 궁금증이 생겼습니다
.
“SwiftUI의 TabView는 여전히 UITabBarController를 쓰고 있을까?”
공식문서를 찾았지만 나와있지 않아 LLDB로 직접 확인했습니다!!
문제의 시작: TabView 위에 터치 오버레이를 올리고 싶었다
특정 탭을 눌렀을 때 실제 전환 대신 바텀 시트를 띄우고 싶었습니다.
그래서 기존에는 이런 방식으로 처리했습니다:
- 화면 너비 ÷ 탭 개수로 위치 계산
- 투명 View를 올려 터치 가로채기
- 탭 전환 대신 원하는 액션을 실행
👉 iOS 18까지는 문제없이 동작
그런데 iOS 26에서는 완전히 깨졌어요
이제 탭바는 화면 하단을 가득 채우지 않고, 중앙에 떠 있는 플로팅 형태에 가까워졌기 때문입니다.
좌우에 여백이 생기면서 화면 너비 ÷ 탭 개수라는 전제가 더 이상 맞지 않게 됐습니다.
- 중앙에 둥둥 떠 있는 플로팅 형태
- 좌우 여백 존재
- 균등 분할 계산 완전히 틀어짐
첫 시도: UITabBar의 실제 frame을 읽어 보자~!
extension UIApplication {
    var tabBarButtonFrames: [CGRect] {
        guard let windowScene = connectedScenes.first as? UIWindowScene,
              let window = windowScene.windows.first,
              let tabBar = findSubview(ofType: UITabBar.self, in: window) else {
            return []
        }
        return tabBar.subviews
            .filter { String(describing: type(of: $0)).contains("TabBarButton") }
            .map { $0.convert($0.bounds, to: window) }
            .sorted { $0.minX < $1.minX }
    }
}
처음에는 SwiftUI 내부가 결국 UIKit 기반일 거라고 생각했습니다.
그래서 UIKit 뷰 계층을 뒤져 UITabBar를 찾고, 그 안의 버튼 frame을 직접 읽는 쪽으로 접근했습니다.
의도는 이랬습니다.
- UIWindow에서 UITabBar를 찾는다
- UITabBarButton을 골라낸다
- 각 버튼의 실제 위치를 읽는다
그런데 결과는 예상 밖이었습니다.
빈 배열. 아무 버튼도 잡히지 않았다.
이 시점에서 처음으로 이런 의심이 생겼습니다.
“혹시 iOS 26에서는 UITabBar 자체가 사라진 걸까?”
LLDB로 직접 확인해보기
원래 사용하는 po를 썼는데 제대로 되지 않았습니다.
그 이유는 po는 Objective-C 표현식 평가에 가깝고 swift code를 실행하려면 expr -l swift --로 써야했습니다
| po | expr -O --의 약어. Objective-C 모드 |
| expr -l swift -- | Swift 모드로 코드 실행 |
| expr -l swift -O -- | Swift 모드 + 결과를 바로 출력 (-O) |
Step 1: UIWindow 잡기
(lldb) expr -l swift -- import UIKit; print(UIApplication.shared.connectedScenes.first!.value(forKey: "windows"))Optional(<UIWindow: frame = (0 0; 390 844)>)Step 2: rootViewController 확인
(lldb) expr -l swift -O -- import UIKit; let w = (UIApplication.shared.connectedScenes
  .first!.value(forKey: "windows") as! [UIWindow])[0];
  "\(type(of: w.rootViewController!))"
먼저 UIWindow를 잡고 rootViewController의 타입을 확인했습니다.
결과는 예상대로였습니다.
"UIHostingController<ModifiedContent<AnyView, RootModifier>>"
rootViewController가 아니라 UIHostingController였습니다. SwiftUI니까 당연하긴합니다.
Step 3: children 확인
(lldb) expr -l swift -O -- import UIKit; let w = (UIApplication.shared.connectedScenes
  .first!.value(forKey: "windows") as! [UIWindow])[0];
  let tab = w.rootViewController!.children[0];
  "\(type(of: tab)) / super: \(type(of: tab).superclass()!)"
그다음 rootViewController.children을 봤습니다.여기서 예상이 깨졌습니다.
"UIKitTabBarController / super: UITabBarController"
우리가 익숙하게 생각하던 UITabBarController가 아니라, UIKitTabBarController라는 클래스가 보였기 때문입니다.
여기서 알 수 있었던 건 두 가지였습니다.
- SwiftUI TabView가 UIKit 기반 탭 컨트롤러를 쓰는 건 맞다
- 하지만 우리가 흔히 말하던 그 이름 그대로의 UITabBarController는 아니다
그리고 더 확인해 보니, 이 클래스는 UITabBarController를 상속한 private 서브클래스였습니다.
Step 4: 서브뷰 확인
(lldb) expr -l swift -O -- import UIKit; let w = (UIApplication.shared.connectedScenes
  .first!.value(forKey: "windows") as! [UIWindow])[0];
  let tab = w.rootViewController!.children[0];
  "\(tab.view.subviews.map { type(of: $0) })"
"[UITransitionView, UIKit._UITabBarContainerWrapperView]"👉 여기서 중요한 포인트
- UITabBar가 없음
- 대신 _UITabBarContainerWrapperView 존재
탭바는 사라진 게 아니라, 더 깊은 계층으로 들어감
Step 5: 전체 뷰 트리 덤프
(lldb) expr -l swift -- import UIKit;
  let w = ...
  let tab = ...
  let wrapper = tab.view.subviews[1];

  func dump(_ v: UIView, _ d: Int = 0) {
    print(String(repeating: " ", count: d) + "\(type(of: v)) frame=\(v.frame)")
    for s in v.subviews { dump(s, d+2) }
  };

  dump(wrapper)
출력:
_UITabBarContainerWrapperView frame=(0.0, 761.0, 390.0, 83.0)
  _UITabBarContainerView frame=(0.0, -761.0, 390.0, 844.0)
    UITabBar frame=(0.0, 761.0, 390.0, 83.0)
      _UITabBarPlatterView frame=(101.0, 0.0, 188.0, 62.0)     ← 플로팅 플래터!
        SelectedContentView
          _UITabButton frame=(4.0, 4.0, 94.0, 54.0)            ← 탭 버튼
          _UITabButton frame=(90.0, 4.0, 94.0, 54.0)
        _UILiquidLensView frame=(4.0, 4.0, 94.0, 54.0)         ← Liquid Glass!
          ClearGlassView
            SDFView → SDFElementView
            _UIPortalView
        ContentView
          _UITabButton frame=(4.0, 4.0, 94.0, 54.0)
          _UITabButton frame=(90.0, 4.0, 94.0, 54.0)
즉 iOS 26 liquid Glass의 탭바 뷰 트리는
UIKitTabBarController (UITabBarController의 private 서브클래스)
│
├── UITransitionView (탭 콘텐츠 전환)
│
└── _UITabBarContainerWrapperView ─── NEW!
    └── _UITabBarContainerView ────── NEW!
        └── UITabBar (여전히 존재!)
            └── _UITabBarPlatterView ── NEW! (플로팅 플래터)
                │
                ├── SelectedContentView
                │   ├── _UITabButton ──── 이름 변경! (was UITabBarButton)
                │   └── _UITabButton
                │
                ├── _UILiquidLensView ── NEW! (Liquid Glass 렌더링)
                │   └── ClearGlassView
                │       ├── SDFView (Signed Distance Field)
                │       └── _UIPortalView (배경 블러 포탈)
                │
                └── ContentView
                    ├── _UITabButton
                    └── _UITabButton
이게 정말 iOS 26에서 바뀐 건가?
여기까지 보면 자연스럽게 이런 생각이 듭니다.
“iOS 26에서 TabView 내부 구현이 완전히 바뀐 거 아닌가?”
하지만 여기서 바로 결론을 내리면 위험합니다.
지금까지 본 건 어디까지나 iOS 26의 결과일 뿐입니다.
정말 iOS 26에서 바뀐 건지, 아니면 원래부터 있었는데 우리가 모르고 있었던 건지 구분하려면
👉 이전 버전에서도 같은 걸 확인해봐야 합니다.
그래서 iOS 18 시뮬레이터를 띄워서, 똑같은 LLDB 명령을 그대로 다시 실행해봤습니다.
iOS 18 디버깅 — 같은 명령으로 다시 테스트
Step 1: 뷰 컨트롤러 확인
// iOS 18
(lldb) expr -l swift -O -- import UIKit; let w = (UIApplication.shared.connectedScenes
  .first!.value(forKey: "windows") as! [UIWindow])[0];
  let tab = w.rootViewController!.children[0];
  "\(type(of: tab)) / super: \(type(of: tab).superclass()!)"
출력:
"UIKitTabBarController / super: UITabBarController"👉 iOS 18에서도 이미 UIKitTabBarController입니다
이 클래스는 iOS 26에서 새로 생긴 게 아니라, 이미 이전부터 존재하던 private 서브클래스였습니다.
Step 2: 서브뷰 확인
// iOS 18
(lldb) expr -l swift -O -- import UIKit; let w = (UIApplication.shared.connectedScenes
  .first!.value(forKey: "windows") as! [UIWindow])[0];
  let tab = w.rootViewController!.children[0];
  "\(tab.view.subviews.map { type(of: $0) })"
출력:
"[UITransitionView, UITabBar]"여기서 iOS 26과의 차이가 바로 드러납니다.
👉 iOS 18에서는 UITabBar가 직접 자식입니다
- wrapper 없음
- 중간 컨테이너 없음
- 바로 접근 가능
Step 3: UITabBar 내부 확인
// iOS 18
(lldb) expr -l swift -O -- import UIKit; let w = (UIApplication.shared.connectedScenes
  .first!.value(forKey: "windows") as! [UIWindow])[0];
  let tab = w.rootViewController!.children[0];
  let bar = tab.view.subviews[1];
  "\(bar.subviews.map { "\(type(of: $0)) frame=\($0.frame)" })"
출력:
[
 "_UIBarBackground frame=(0.0, 0.0, 390.0, 83.0)",
 "UITabBarButton frame=(2.0, 1.0, 191.0, 48.0)",
 "UITabBarButton frame=(197.0, 1.0, 191.0, 48.0)"
]
여기서도 중요한 차이가 보입니다.
- 버튼 클래스: UITabBarButton
- layout: 화면 전체를 균등 분할
Step 4: 탭바 배경 확인
// iOS 18
(lldb) expr -l swift -O -- import UIKit; let bg = bar.subviews[0];
  "\(bg.subviews.map { "\(type(of: $0))" })"
출력:
["UIVisualEffectView", "_UIBarBackgroundShadowView"]👉 전통적인 blur (UIVisualEffectView)
Step5: 탭 버튼 내부 확인
// iOS 18.0
(lldb) expr -l swift -O -- ... let btn = bar.subviews[1];
  "\(btn.subviews.map { "\(type(of: $0)) frame=\($0.frame)" })"
[\"UIVisualEffectView frame=(0.0, 0.0, 191.0, 48.0)\",
\"UITabBarSwappableImageView frame=(81.7, 4.0, 27.3, 27.3)\",
\"UITabBarButtonLabel frame=(91.7, 34.3, 7.3, 12.0)\"]여기서도 iOS 26과의 차이가 분명하게 드러납니다.
- 배경 효과는 여전히 UIVisualEffectView
- 아이콘은 UITabBarSwappableImageView
- 텍스트는 UITabBarButtonLabel
저기 있는 UITabBarSwappableImageView덕분에 선택 상태에 따라 outline/ filled 아이콘을 바꿔 끼울수 있는 것 같아요
반면 iOS 26에서는 이런 전용 뷰 대신 더 단순한 UIImageView 기반 구조로 바뀌어 있었습니다.
즉, iOS 18의 탭 버튼은 전통적인 탭바 구성 요소가 비교적 명확하게 분리되어 있는 구조이고,
iOS 26에서는 이 버튼 구조 자체도 Liquid Glass 스타일에 맞게 다시 설계된 셈입니다.
iOS 18 vs iOS 26: 최종 비교
여기까지 각각 따로 확인한 내용을 한 번에 비교해보면 차이가 더 명확해집니다.

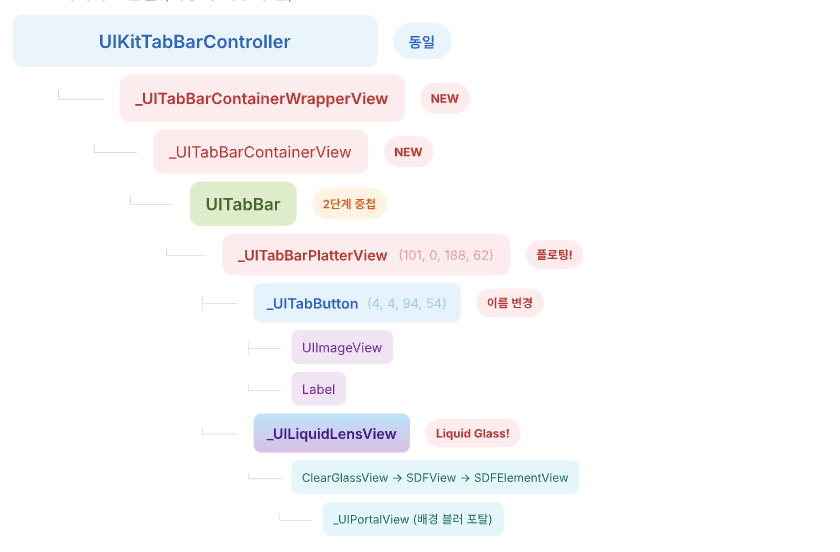
레이아웃 비교

상세 비교표
| Tab Controller | UIKitTabBarController | UIKitTabBarController | 동일 |
| superclass | UITabBarController | UITabBarController | 동일 |
| UITabBar 위치 | 직접 자식 | _UITabBarContainerWrapperView 중첩 | 변경 |
| 탭바 배경 | _UIBarBackground → UIVisualEffectView | _UILiquidLensView → SDFView | 변경 |
| 탭 버튼 클래스 | UITabBarButton | _UITabButton | 변경 |
| 버튼 아이콘 | UITabBarSwappableImageView | UIImageView | 변경 |
| 버튼 라벨 | UITabBarButtonLabel | Label | 변경 |
| 버튼 레이아웃 | (2, 1, 191, 48) — 전체 너비 균등 | (4, 4, 94, 54) — 플래터 내부 | 변경 |
| Glass 렌더링 | 없음 | _UILiquidLensView + ClearGlassView + SDFView | 신규 |
마무리: 해결 방식
처음에는 단순히 클래스명을 문자열로 필터하면 될 거라고 생각했습니다.
하지만 실제로 확인해보니 iOS 18은 UITabBarButton, iOS 26은 _UITabButton으로 이름이 달랐고, contains 같은 부분 문자열 매칭은 생각보다 쉽게 깨졌습니다.
그래서 첫 번째로 바꾼 건, 문자열 일부 포함 여부가 아니라 직접 확인한 클래스명을 정확하게 비교하는 방식이었습니다.\
두 번째 문제는 iOS 26에서 버튼이 두 벌씩 잡힌다는 점이었습니다.
LLDB로 본 것처럼 _UITabBarPlatterView 안에는 SelectedContentView와 ContentView가 함께 있었고, 같은 위치의 버튼도 중복으로 존재했습니다.
=> 이 부분은 버튼을 모두 수집한 뒤 window 좌표계로 변환하고, 같은 frame은 하나만 남기도록 정리하는 방식으로 해결했습니다.
세 번째는 타이밍 문제였습니다.
SwiftUI의 body가 처음 평가되는 시점에는 UIKit 뷰 계층이 아직 완전히 올라오지 않아서, 버튼 frame을 읽으면 빈 배열이 나오는 경우가 있었습니다.
그래서 frame은 처음부터 계산하려 하지 않고, 뷰가 실제로 화면에 나타난 뒤 읽어서 @State에 저장하는 식으로 바꿨습니다.
결국 이번 해결 방식의 핵심은 이렇습니다.
- UITabBar는 재귀적으로 찾고
- 탭 버튼은 iOS 18과 iOS 26의 실제 클래스명을 기준으로 찾고
- iOS 26에서 중복으로 잡히는 버튼은 frame 기준으로 정리하고
- 마지막으로, 실제로 얻은 버튼 좌표 위에 오버레이를 올린다
즉, 예전처럼 화면 전체를 탭 개수로 나눠서 추정하는 방식이 아니라,
실제 뷰 계층과 실제 frame을 읽어서 오버레이를 배치하는 방식으로 바뀐 셈입니다.
코드는 아래처럼 정리했습니다.
// MARK: - UIApplication Extension

extension UIApplication {
    func getTabBarButtonFrames() -> [CGRect] {
        guard let windowScene = connectedScenes.first as? UIWindowScene,
              let window = windowScene.windows.first,
              let tabBar = findSubview(ofType: UITabBar.self, in: window) else {
            return []
        }

        var buttons: [UIView] = []
        findTabButtons(in: tabBar, results: &buttons)

        var seen: Set<String> = []
        return buttons
            .map { $0.convert($0.bounds, to: window) }
            .sorted { $0.minX < $1.minX }
            .filter { seen.insert("\($0)").inserted }
    }

    private func findSubview<T: UIView>(ofType _: T.Type, in view: UIView) -> T? {
        if let match = view as? T { return match }
        for subview in view.subviews {
            if let found = findSubview(ofType: T.self, in: subview) {
                return found
            }
        }
        return nil
    }

    private func findTabButtons(in view: UIView, results: inout [UIView]) {
        for subview in view.subviews {
            let name = String(describing: type(of: subview))
            if name == "UITabBarButton" || name == "_UITabButton" {
                results.append(subview)
            } else {
                findTabButtons(in: subview, results: &results)
            }
        }
    }
}

// MARK: - TabBarTouchOverlay

private struct TabBarTouchOverlay: View {
    let buttonFrames: [CGRect]
    let onRecordTap: () -> Void

    var body: some View {
        GeometryReader { proxy in
            let origin = proxy.frame(in: .global)

            if buttonFrames.count >= 3 {
                ZStack(alignment: .topLeading) {
                    cover(for: buttonFrames[0], origin: origin)  // Home
                        .onTapGesture { /* 차단 */ }

                    cover(for: buttonFrames[2], origin: origin)  // Record
                        .onTapGesture { 할거하자() }
                }
            }
        }
        .frame(height: buttonFrames.first.map { $0.height + 10 } ?? 60)
    }

    private func cover(for frame: CGRect, origin: CGRect) -> some View {
        Color.clear
            .contentShape(Rectangle())
            .frame(width: frame.width, height: frame.height)
            .offset(x: frame.minX - origin.minX, y: frame.minY - origin.minY)
    }
}
정리하면, iOS 26에서 탭바 오버레이가 어긋난 이유는 TabView 자체가 완전히 새로 구현돼서가 아니라,
탭바 내부 구조와 레이아웃이 달라졌기 때문이었습니다.
실제로 그려진 탭 버튼의 좌표를 읽고 그 위에 정확히 오버레이를 올리는 것이었습니다.
이번 작업을 하면서 다시 느낀 건 하나였습니다.
추측하지 말고, 직접 확인하자.(삽질의 시간이 중요하다)
'SWIFT개발일지' 카테고리의 다른 글
| iOS FCM 푸시 알림 — 동작 원리부터 권한 타이밍까지 컨트롤하기 (0) | 2026.05.26 |
|---|---|
| TCA Dependency는 어떻게 동작하는지 정확하게 설명할수 있는 사람 (0) | 2026.05.24 |
| 로컬 알림 다국어 적용기: 언어가 바뀌어도 알림을 다시 등록하지 않아도 되는 이유 (1) | 2026.02.03 |
| 왜 한번 빌드 이후부터는 빌드가 더 빠를까? - 증분 빌드 (0) | 2026.01.25 |
| ProtoBuf - 이게 뭔데 사람들은 환호성을 지를까? (1) | 2025.11.29 |